Contactless optical extensometer
The present invention suggests a novel laser-based system, which allows for a contact-free measurement of deformations/strains. The system can be easily implemented in complex testing setups and yields enhanced performance characteristics.
Challenge
The measurement of mechanical stresses and strains is indispensable and of particular importance when it comes to acquisition and evaluation of the mechanical behaviour of materials and/or complex, technical components. Due to its easy application, flexibility and indirect coupling to samples/objects, equipment for a contact-free strain measurement is increasingly gaining popularity. Appropriate laser-based systems are available in the form of so-called Laser-Doppler measuring instruments. Typically, such devices are composed of two (coupled) Laser-Doppler components, which both exhibit a laser beam source and a detector for the measurement of the velocity or the displacement in a predetermined direction of a preset measuring point on the object to be measured. Despite their approved and broad practical usage, such systems can be complex in their setup and lack desirable performance features (e.g. precision, resolution and efficient signal exploitation), which can limit their application.
Our Solution
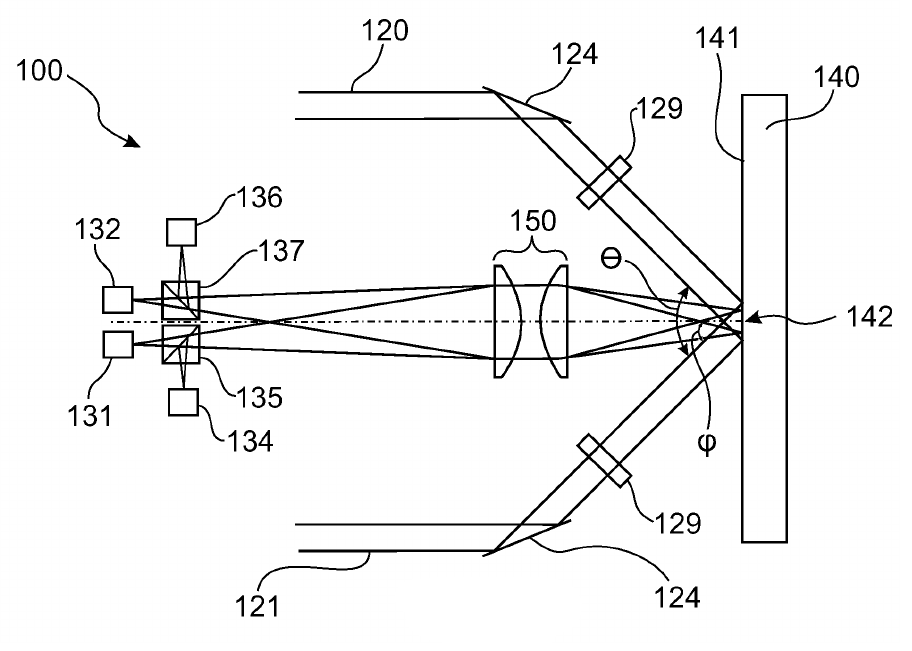
The present invention picks up some aforementioned concepts and yields a set of crucial improvements (see section Advantages), which opens new avenues for application in industrial and/or scientific sectors. According to the invention and within the interest of constructional simplicity, the system (Fig. 1) is composed of only one laser beam source, a beam splitting device and a device for frequency shift of the radiation emitted by the laser. Upon generation of two (to each other) frequency-shifted laser beams, the beams are brought to interference under a certain angle on the object to be measured. Thereby, an interference fringe pattern is generated, which first and second (disjunctive) portion/range is acquired by two independent photodetectors (see Fig. 2), followed by intensity evaluation. Hence, in difference to the available laser-based strain measurement systems, two independent measuring points can be obtained from one interference fringe pattern by optical imaging and electronic evaluation. In order to evaluate the strain or strain velocity over time, the difference in Doppler shifts of the two signals can be calculated. Preferentially, both demodulated signals are subtracted from each other by a so-called frequency subtractor. Thus, from signals arising from the photodetectors, the velocity or the deflection in direction perpendicular to the intereference fringes can be measured according to Δs·φ/2π (with φ being the phase of the demodulated signal and Δs being the distance between the interference fringes).
 Fig. 1: Setup of the contactless, optical extensometer (adaptation according to patent application).
 Fig. 2: Interference fringe patterns showing the first and second pattern portion/range imaged on the photodetectors, respectively (adaptation according to patent application).
Advantages
- Contact-free measurement (samples/components not influenced by measuring equipment)
- High strain resolution (even in the elastic deformation range)
- Simple implementation for complex experimental/testing setups
- Enhanced precision (in comparison to available Laser-Doppler systems)
- Enhanced and more efficient exploitation of the interference fringe patterns
- System is not endangered during experiment/testing and at rupture of the sample/object
Applications
- Measurement of strain and acquisition of mechanical stresses of any kind
- Oscillation and vibration measurement
- Suitable for industrial and scientific tasks
Development Status
The functionality of the system has been approved in vibration test facilities on industrial scale.
Patent Status
German patent application: DE102018111921A1
International patent application: WO002019219133A1
European patent application: EP000003794309A1
Contact
Dr. Mirza Mackovic
Patent Manager Technology
E-Mail: This email address is being protected from spambots. You need JavaScript enabled to view it.
Tel.: +49 551 30724 153
Reference: CPA-2263-T246
Tags: Measurement and analysis technology, Laser physics and optics, Physics and Technology & Software
